Sneakily delicious dishes that bring all the omnivores to the yard! Look for the cookbook in 2010!

Wednesday, April 14, 2010

P-p-p-pizza!

Pizza

Everybody loves pizza, even {and especially!} vegans. When I went vegan, I thought my pizza days were over. Silly rabbit that I was - turns out vegan pizza is especially good!

The Ninjahusband and I love to make pizza together at home. Unfortunately, our opinions differ on appropriate toppings, but one thing we can agree on is our dough. He is a master of dough-making, and we have recently discovered {and tweaked} what we think is the best pizza dough recipe out there.

Super Sneaky Ninja Pizza Dough
Makes 2 crusts, 4 mini crusts, or 3 calzones

2 tbsp dry active yeast {or 2 packets}
1/2 tsp sugar
1/2 cup warm water
3 1/2 cups flour
3 tbsp olive oil
1 tsp salt

1. Gently whisk together yeast, sugar, and water. Set aside for 5 - 10 minutes, until the yeast has "bloomed". You will know it is ready when it looks kind of frothy and bubbly.

2. Combine flour and salt in the bowl of a stand mixer, with the dough hook attached.

3. Add the yeast mixture to your flour, as well as the olive oil, and knead with the dough hook for 5 - 10 minutes until thoroughly mixed and elastic.

4. Dump the dough out onto the counter, and knead a little more, until the dough is easy to work with. Divide into 2 for regular sized pizzas {or 4 for mini pizzas, or 3 for calzones}, and stretch each into an approximate crust shape. Let rest for 10 minutes.

5. Stretch the dough again into its final, desired shape. Top, and bake at 500 F for 12 minutes, until the edges are golden.


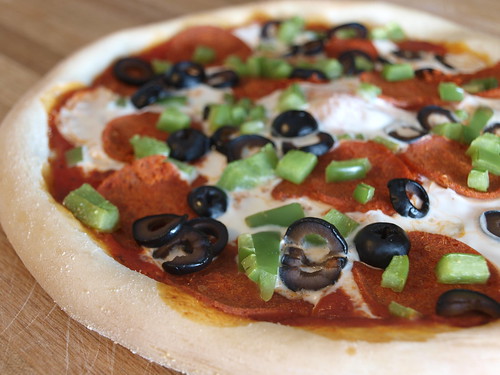
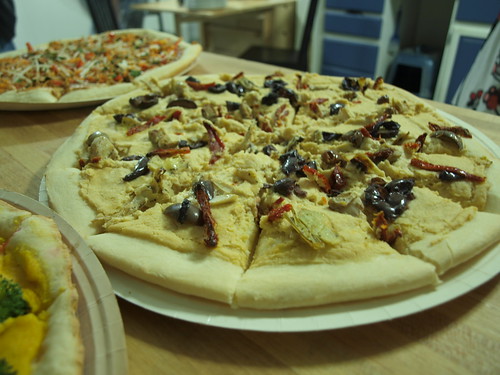
You can top your pizza with anything you like. The possibilities are endless. With pizza nowadays, I like to think outside of the "cheese" realm, however the pizza above features Teese vegan cheese, Smart Deli pepperoni, green peppers, and black olives. I also made a killer calzone the other day with Daiya vegan cheese, Smart Deli pepperoni, green peppers, sauteed mushrooms and garlic, and black olives.

Mmmm pizzalicious!

Tuesday, April 13, 2010

White Girl Daal

Daal w/ Basmati Rice

In our household, Indian-inspired food is queen. Ever since he was 10 months old and had his first taste of channa masala, the Supertoddler has devoured Indian food like it was his last meal. I have a couple of good Indian cookbooks, and we have an amazing Indian restaurant in the area. Those things, paired with the emergency Amy's frozen Indian food dinner have been able to fulfill almost any need for the cuisine that we've had over the last couple of years. I've not really ventured off into my own territory, making my own creations using those flavorful ingredients...until now.

I've never found a daal recipe that I've been satisfied with. They always seem to come out very bland and lacking the umph daals have in restaurants. One night, when Supertoddler was begging for his beloved Indian food, I decided to try my hand at creating my own simple daal from quick-cooking red lentils. How hard could it be?

The resulting daal, although possibly not very authentic {I don't know, any seasoned Indian chefs, help me out here} was flavorful and rich, and the leftovers were lovely for days to come. It is now the Supertoddler's favorite dish, and he asks for it often. I present to you...White Girl Daal {so respectfully named on account of my inability to assure you of any degree of its authenticity}.

White Girl Daal
Makes 4-6 servings.

3/4 cup red lentils, rinsed and picked over
water {I'll explain amounts later}
1/2 tsp tumeric
1 medium yellow onion, diced
1 14.5oz can diced tomatos, drained {or one large tomato, chopped}
2 tbsp canola or other mild-flavored oil
1 clove of garlic, minced
4 curry leaves, chopped {optional} - you can find these at an Indian market
1 tsp cumin
1 tsp coriander
1/2 tsp garam masala {an Indian spice blend}
salt, to taste

1. In a medium pot, combine lentils, 1 1/2 cups of water, tumeric, and onion. Bring to a boil, and simmer for about 20 minutes, until the lentils are tender and starting to break apart. During this simmering time, stir the lentils every few minutes, and if they look like they are getting low on water {and trust me, they will} add another half a cup. I honestly have no idea how much water I usually add to this, as it varies every time. Just keep an eye on it, trust yourself, and add water as you feel it is needed.

2. Add the tomato, and continue to simmer as you prepare the other ingredients.

3. Heat the oil in a skillet over medium high heat. Add garlic, curry leaves {if using}, and spices. Sautee until the garlic is golden {but not burnt!}. Add this mixture to the lentils, and stir to combine.

4. Season with salt to taste, and allow to cook for another 5 minutes to blend flavors. Serve with rice or flatbread.

Tuesday, March 23, 2010

Cashew Fettuccine Alfredo

Cashew Fettuccine Alfredo

In my pre-vegan {pregan? heh} days, one of my favorite things to order in an Italian restaurant was fettuccine alfredo. Since going vegan, I have been searching for a good alfredo recipe, but as of yet have come up short.

This recipe from VegWeb, called Cashew Fettuccine Alfredo, is closer than anything I've tried thus far. I feel like I'm on the right track now. Some spice modifications, and I think this recipe will be spot on.

Cashew Fettuccine Alfredo
Makes 6 servings.

1 lb fettuccine pasta, cooked al dente
1 cup raw cashews
3 cups boiling water
1 tbsp lemon juice
3 garlic cloves, crushed
2 tbsp olive oil
6 tbsp nutritional yeast
1/4 tsp nutmeg
salt & pepper to taste

1. Grind the raw cashews in a food processor or blender until finely powdered. Slowly pour in the boiling water and process until smooth. Add lemon juice, garlic, olive oil, nutritional yeast, and nutmeg, and continue processing until the sauce has thickened and is well blended.

2. Pour the sauce into a large pan with the noodles, and toss gently until the sauce thickens and is hot. Salt & pepper to taste. Serve with peas, broccoli, and/or garlic bread.

Monday, March 22, 2010

Pretty Much the Best Blended Salsa of All Time

Blended Salsa

As a counterpart to the ever-delicious Pretty Much the Best Hummus of All Time, I bring to you Pretty Much the Best Blended Salsa of All Time.

As a general hater of anything that includes raw onions, the only way I can truly enjoy salsa is in its blended form. I've tried many a time to make blended salsas at home, with raw tomatoes, only to end up with grainy, mushy, and sickly orange concoctions. While researching salsa recipes on the internet, I found a recipe where the author used canned tomatoes for his salsa.

Canned tomatoes? OH THE HORROR! Say it ain't so! But it is so. And they make the best blended salsa you will ever put in your mouth. Swallow your authenticity-related pride and make this salsa. I promise you will not be disappointed.

Pretty Much the Best Blended Salsa of All Time
Makes a large jar full.

1 28 oz can whole tomatoes, slightly drained {how much liquid you keep is up to you, I like to keep about half}
1/2 bunch cilantro leaves
1/2 onion, chopped
2 cloves garlic, smashed
2 or 3 Guajillo or other dried chiles, rehydrated in hot water for 20 minutes
juice from 2 limes
2 jalapeno peppers, seeded and chopped

Blend everything in your food processor or blender until it reaches your desired consistency. Taste and add salt as necessary. Store in a glass jar in the fridge.

Sunday, March 21, 2010

Gnocchi with Zucchini and Portabella Mushrooms

Gnocchi w/ Portabellas and Zucchini

As much as possible, I try to feature my own recipes on this blog. However, sometimes a recipe from a fellow vegan's blog stands out so much that I simply must mention it here as well. Gnocchi with Zucchini and Portabella Mushrooms from Fat Free Vegan is just one such recipe.

This simple dish is easy to put together, nutritious, and absolutely packed with flavor. It is one of my top 10 favorite foods, hands down. The author is critical of it on her blog, but I made the suggested change of cubing the zucchini instead of cooking it in ribbons, and it comes out perfectly for me every time.

I'm a cook who is not shy to add a little olive oil to a pan to help the cooking process along, and I have the belly to show for it. Despite the temptation to do so in this recipe, I refrained, and was richly rewarded with the deeply caramelized flavor of the zucchini and mushrooms. Every bit of the goodness is deglazed off the bottom of the pan by the tomatoes. You may not have faith in this dry cooking method as you're making this recipe, but trust me. Follow the directions, and you will come out with an end result that sends your mouth on a flavor trip through the planets.

This dish is so loaded with vegetables that you don't even really need a vegetable to round out your meal. The photo above shows the gnocchi served alongside some black bean croquettes with vegan hollandaise sauce. Scrumptious!

Saturday, March 20, 2010

Mexican Rice

Mexican Rice

While in Arizona visiting a good friend, we went to a wonderful Mexican place for dinner. I thought we had good Mexican food here in Utah, but it's NOTHING compared to the Mexican in Arizona! I thought my tastebuds were going to die of happiness.

Surprisingly, the highlight of the meal was the chile and tomato-studded Mexican rice served on the side. It was extremely flavorful, and the little pieces of green chile and tomato throughout the rice were dynamite.

As soon as I came home, I had to recreate it.

Mexican Rice
Makes 6 servings.

2 cups white rice {long grain would be especially good here, as it wouldn't be as sticky as the short grain I used}
4 cups good vegetable broth {I used Better Than Bullion No-Chicken Broth}
1 14oz can diced tomatoes, undrained
2 6oz cans diced green chiles, mild or hot, depending on your spice tolerance, undrained
2 tbsp olive oil
salt, pepper, and fresh lime juice, to taste

1. In a medium pot, combine rice, broth, tomatoes, chiles, and olive oil over medium high heat. Bring to a boil. Turn heat to low, cover rice, and cook for 15 - 20 minutes, until rice is tender and liquid is absorbed.

2. Season to taste with salt, pepper, and fresh lime juice. Serve alongside any Mexican dish. In the picture above, the rice was served alongside chile lime refried beans.

Friday, March 19, 2010

Filled Cupcakes

Boston Cream Pie Cupcake

I've recently made a wonderful discovery -- most Jello Instant Puddings are vegan. The milk you would usually make them with isn't of course, but that can be remedied. Soy milk doesn't have enough fat in it to get the pudding to set up, but coconut milk has enough and more! In place of the 2 cups cow's milk called for, I make it with 1 1/2 cups coconut milk and 1/2 cup soy milk, and voila! Instant vegan pudding.

I don't like to eat the pudding straight as it is, with that amount of fat in it {although it's good for getting some extra fat and calories into Supertoddler on days when he's not eating enough}. However, pudding made in this manner is PERFECT for filling cupcakes.

In the cupcake pictured above, I used the Golden Vanilla Cupcakes recipe from Vegan Cupcakes Take Over the World, poked my finger in the middle of the cooled cupcake, and piped the pudding right into the middle. I then covered the cupcake with gnache {you can also use vegan buttercream frosting}. It resulted in a delicious "Boston Cream Pie" cupcake, perfectly rich and decadent.

The flavor combinations are endless: pumpkin chocolate chip cupcakes with "cheesecake" filling and cinnamon buttercream frosting, vanilla cupcakes with chocolate filling and chocolate butter cream...use your imagination.

I've gotten dozens more compliments on my cupcakes since I started filling them with pudding, and little do they know...I cheated. Shhh...don't tell.

Thursday, March 18, 2010

Super Toddler's Little Vegan Meals - Mac n' Cheese

Little Vegan Meal - Mac n' Cheese w/ veggie dog, orange, vegetables

Yes, I too sometimes feed my kid mac n' cheese and hot dogs, just like every other parent. The difference is that the mac n' cheese I make isn't from a blue box, and no animal ever had to suffer to make our hot dogs. Supertoddler's Little Vegan Meal on this occasion is mac n' cheese, sliced veggie dogs, orange sections, and steamed mixed vegetables. Quick, affordable, and nutritious!

I have many different mac n' cheese recipes that I make on a regular basis, but the quickest, easiest {and Supertoddler's favorite} mac n' cheese recipe is from the Fat Free Vegan blog. Supertoddler and I always halve the recipe {the full recipe makes a TON}, and we leave out the cayenne pepper. It can be whipped up in the amount of time it takes to boil the macaroni, and is made from ingredients that I always have on hand. As an added bonus, it has hardly any fat, lots of nutrients, and is extremely delicious {the Ninjahusband and I love it too!}

After you make the sauce, and while the macaroni is cooking, you have time to peel an orange, pan-fry a veggie dog {we like Smart Dogs brand}, and nuke some frozen vegetables. Dinner accomplished!

Wednesday, March 17, 2010

1000 Vegan Recipes Update - 1/28 - 3/12

Quick Apple Crisp
Quick Apple Crisp

Vanilla Walnut Cookies

Drop Biscuits

Spiced Apple Pancakes

This last month I've been screaming busy with work, traveling, and re-tiling the kitchen floor. As my life starts to calm down, I promise both my posts for this blog and the 1000 Vegan Recipes blog will become much more frequent!

Tuesday, March 16, 2010

Anti-Superbowl Party -- A Much Belated Account

Phyllo-Wrapped Asparagus and Stuffed Mushrooms

Ninjahusband and I are both completely disinterested in watching sports. We can both think of dozens of things we'd rather do than watch a sporting event. Thus, it's become somewhat of a tradition in our house to have an Anti-Superbowl Party, where we play video games and eat copious amounts of amazing food. This year we had my good friends Dean & Kristina, the Wondersisters, and Supertoddler's girlfriend {Super H} and her family over. We had an amazing time eating and playing Rock Band while laughing, talking, and creating a general ruckus.

The menu was elaborate and took a lot of effort, but was completely delicious. I served:

Phyllo-Wrapped Asparagus Spears and Stuffed Mushrooms drizzed with truffle oil {pictured above}

A Variety of Dips: creamy hummus, blended salsa, smooth guacamole, and butternut squash dip, served with whole grain and blue corn tortilla chips

Mediterranean Pizza: hummus "sauce", sundried tomatoes, artichoke hearts, greek olives, and roasted red peppers

Veggie Patch Pizza: carrot butter pate, slivered red onions, shoestring beets, and broccoli

Thai Pizza: creamy peanut sauce, red bell pepper, grated carrots, bean sprouts, chopped peanuts, and cilantro

Taco Pizza: enchilada sauce, Mexican-style "ground beef", Favorite Cheese Sauce, lettuce, tomatoes, and vegan sour cream {this was the favorite of the evening}

For dessert there was Cinnamon Swirl Pumpkin Cheesecake and fudge {not pictured}.

After that much work in the kitchen, it was nice to relax and hang out with my friends, and enjoy all that great food with them!

Monday, March 15, 2010

Vegan Sour Cream Chicken Enchiladas

Vegan Sour Cream Chicken Enchiladas

I don't feel like this recipe really needs any introduction; who doesn't love enchiladas? Especially creamy, cheesy, spicy enchiladas? Mmm, I'm getting hungry again just thinking about it.

This recipe was inspired by this recipe on VegWeb. After some major modifications, here is the deliciousness I came up with:

Sour Cream Chicken Enchiladas
Makes 1 9x13" Pan

4 oz "chik'n strips", or equivalent frozen, thawed and drained tofu (not silken!), diced
1 tbsp olive oil
1 poblano chile, seeded and diced
1/2 zucchini, diced
1/2 medium onion, chopped
1 potato, peeled and diced small
1 cup corn, canned or frozen
1 cup black beans
1/2 bunch cilantro, roughly chopped
1 cup diced tomatoes, canned or fresh
1 1/2 tsp ground cumin
1 teaspoon oregano
6 oz Tofutti "Better Than Sour Cream", or to taste
1 tbsp chipotle in adobo, pureed
1 16 oz. can green or red enchilada sauce, or I like this recipe, with the spices majorly amped
1/2 recipe Favorite Cheese Sauce, found in this post
9 - 12 6" corn tortillas, softened in the microwave
lettuce, tomatoes, green onions, guacamole, black olives etc for garnish

1. Preheat the oven to 500F.

2. Toss the chile, zucchini, onion, potato, and corn in olive oil. Spread on a foil-lined baking pan. Roast until starting to brown, stirring several times throughout. The amount of time you roast will depend on how dark you like your vegetables.

3. Turn the oven down to 350F. In a large bowl, toss together "chik'n" or tofu, roasted vegetables, beans, cilantro, tomatoes, cumin, oregano, sour cream, and chipotle in adobo until well combined. This is your filling.

4. Spread a small amount of enchilada sauce on the bottom of a 9x13" pan. Dip each tortilla in the enchilada sauce, stuff with filling, roll, and place seam-side down in the pan. Continue until you run out of tortillas/filling, or until your pan is full.

5. Pour the remaining enchilada sauce over top, and carefully spread the Favorite Cheese Sauce over that. Cover with foil and bake for 20 minutes. Remove the foil and bake an additional 10 minutes, until cheese sauce is slightly browned and bubbly.

6. Serve immediately, topped with tomato, green onion, lettuce, guacamole, black olives, or whatever you'd like.

Sunday, March 14, 2010

Supertoddler's Little Vegan Meals - Super Noodle Soup

Little Vegan Meal

Today I bring you another of Supertoddler's favorite Little Vegan Meals. In addition to fighting crime and destroying a tidy house in a matter of seconds, Supertoddler also souper loves...soup. This dinner features his favorite comfort soup - a brothy noodle soup with carrots and onions. Quick and easy to make, this pairs nicely with whole grain toast, fruit {Supertoddler's choice was grapefruit and blood orange}, and soy milk.

Super Noodle Soup
2 big servings

1 tbsp olive oil
1/2 medium onion, finely diced
2 carrots, thinly sliced
4 cups vegetable broth {I use Better than Bullion No-Chicken Broth Paste}
2 oz angel hair pasta, broken into thirds

1. Saute the onion and carrot over medium heat, until softened, about 8 minutes.

2. Add the broth and bring to a boil. Stir in the angel hair pasta, and allow to bubble for 5 - 8 minutes, until pasta and carrots are both tender. Serve with toast or bread for dipping.

You can add just about anything to this soup, including beans, panfried tofu, vegan "chicken", or other vegetables. Supertoddler prefers his Super Soup just like this...but maybe someday I'll sneak in some celery.

Saturday, March 13, 2010

Cheesy Potato Casserole


Having grown up in the Mormon church, there will always be a special spot in my heart {and on my dinner plate} for casseroles. If you're not familiar with Mormon food culture, let me introduce you to our world in one quick sentence: Casseroles, and lots of them. There are casseroles for every occasion, but one of the most "telling" of the Mormon casseroles is the beloved funeral potatoes {aptly named because they are generally served to the grieving family after a funeral}. These creamy cheesy potatoes are comforting, full of fat, and decidedly not vegan.

Imagine my nostalgic delight upon finding this similar recipe on VegWeb. After a bit of tweaking, I think this recipe will satisfy any vegan's longing for Mormon Funeral Potatoes. Here is my version:

Vegan Funeral Potatoes
Makes 1 9x13" pan

1/2 cup soy milk
1/2 cup no-chicken broth {I use Better Than Bullion No-Chicken Broth Paste}
8 oz. vegan sour cream {I use Tofutti Better-Than-Sour-Cream}
1 recipe Favorite Cheese Sauce {recipe below}
2 lb bag of frozen hash browns, thawed {squares}
3 cups corn flakes cereal
3 tbsp vegan butter, melted {I use Earth Balance Buttery Sticks}

1. Preheat the oven to 350 degrees. Lightly grease a 9x13" casserole dish {preferably glass} and set aside.

2. In a large bowl, stir together soy milk, broth, sour cream, and cheese sauce until well combined. Fold in hashbrowns gently until well coated. The mixture will be very soupy. Do not be alarmed, it will thicken in the oven. Spoon the mixture in the prepared casserole dish.

3. Crush the corn flakes and mix with the melted butter. Sprinkle over the top of the casserole.

4. Cover the casserole with foil and bake for 25 minutes. Remove the foil, and bake for another 15 minutes or so, until the casserole is heated and has thickened, and the corn flake topping is crisp. Serve immediately.

Favorite Cheese Sauce
Makes 3 cups

1 cup raw cashews {pieces is fine, they don't have to be whole}
2 cups water
1 small red bell pepper {or 1/4 cup canned pimentos or roasted red peppers}
1 1/2 tsp salt
1 tsp onion powder
1 tsp garlic powder
2 tbsp nutritional yeast flakes
1 tsp prepared yellow mustard
1 tbsp lemon juice

Blend all ingredients in a food processor or blender until smooth, several minutes. Pour the sauce into a medium-sized pan, bring to a slow bubble, and cook until it has thickened.

Thursday, March 11, 2010

Roasted Radishes and Broccoli


I am a major proponent of roasting vegetables. The caramelization that happens during the process of roasting brings out all the inherent sweetness in the vegetables, without adding much extra fat.

I was in the grocery store one day, looking at the radishes and thinking "Radishes, you are the stupidest vegetable ever. What are you good for?" As I picked up some broccoli {my favorite vegetable to roast}, it dawned on me...maybe radishes would improve if I roasted them! I grabbed a couple of bundles, and went home to try my experiment.

I preheated the oven to 400F, tossed the radishes and broccoli in a drizzle of olive oil and a few grinds of pepper and salt, spread them out on the pan, and roasted them until they were starting to caramelize and brown on the outside {about 20 - 30 minutes, stirring several times throughout}.

The resulting radishes were nutty and full of a mild, sweet flavor. Alas I had finally found a use for that pesky no-good vegetable!

A word of slight warning: the texture is not what you might expect. In the roasting process, the radishes lose all of their denseness, and the result is an internal texture that is a touch on the mushy side. The Ninjahusband found it kind of weird, but I didn't mind it at all.

Give roasting a try...try it with any vegetable! I bet you'd be hard-pressed to find something that was not improved by a little olive oil and salt and a brief stay in your oven.

Wednesday, February 3, 2010

Supertoddler's Little Vegan Meals - Tofu Dinos, Roasted Broccoli, Strawberries

Tofu Dinos w/ Strawberries and Roasted Broccoli

I figured, since I'm raising a little Supertoddler, it might be helpful to other parents if I posted his meals from time to time. Just like any toddler, the Supertoddler is picky and likes to exert his independence in every way possible, especially at mealtime. He may eat foods that are unfamiliar to non-vegan kids and families, but by involving your kids in the preparation of food, you'd be surprised what you can get them to eat!

A Little Vegan Meal that the Supertoddler recently enjoyed was tofu dinos, roasted broccoli, and strawberries.

Roasted Broccoli: Preheat the oven to 400 degrees. Cut broccoli into bite-size florets and place in a relatively large bowl. Drizzle with olive oil and freshly ground salt and pepper. Have your child toss the broccoli {with clean hands} to coat, and then spread the broccoli onto a foil-lined baking sheet. Bake for 20 - 30 minutes, until desired doneness is reached, stirring half way through. Roasting broccoli makes it crunchy and nutty, and more friendly to a kid's palette.

Tofu Dinos: While the broccoli is roasting, drain a block of extra firm tofu. Give it a gentle squeeze in a towel to get out as much extra moisture as possible without compromising the structural integrity of the tofu. Slice horizontally into 4 large sheets. Pat each sheet dry with a paper towel. Let your little one help you cut shapes out of the tofu with cookie cutters, saving the scraps for a future date {did someone say tofu scramble? Yum!}. This time Supertoddler chose dino shapes, but you can use whatever you'd like. Heat a bit of vegetable oil in a large pan over medium to medium-high heat. Add the tofu, and cook until golden brown on both sides {about 5 minutes on the first side, 3 on the second}. Remove the tofu shapes from the pan, drain on paper towels, and sprinkle with salt while they're still hot. Serve with dipping sauce of choice {Supertoddler likes stone ground mustard}.

This meal can be rounded out with a fruit of your child's choice {in this instance, Supertoddler demanded strawberries with such conviction that I was sure his little life was going to end if he didn't get them}, and a grain {Supertoddler wanted whole wheat toast}.

Stay tuned for the next installment in Supertoddler's Little Vegan Meals.

Tuesday, February 2, 2010

Decadent Cherry Torte

Cherry Torte

My sweet sister-in-law, noticing that I never ate any dessert at family functions {not vegan}, set out to make a delicious dessert for me as a surprise for our next family function. Imagine my surprise when I arrived at her house to find that she'd made me a decadent, fluffy, creamy, sinful, and delicious cherry torte! The dessert was one of the very best things I've ever put in my mouth. After thanking her profusely, I asked her for the recipe. She emailed me the link she'd gotten the recipe from.

I made some slight modifications, and made the torte again myself, this time for a group of friends.

Decadent Cherry Torte
Serves 8 - 12

1 cup vegan butter {I used Earth Balance buttery sticks}, softened
1 1/2 cups unbleached white flour
1/2 cup whole wheat flour
4 tbsp unrefined sugar
1/2 cup vegan chocolate chips {I used Ghirardelli brand}
2 10oz cartons Soyatoo Soy Whip {I found mine at Good Earth}
1 8oz tub Toffuti Better Than Cream Cheese {Good Earth, Harmon's, and Whole Foods all carry this}
1 cup powdered sugar
1 tsp vanilla extract
1 21oz can cherry pie filling

1. Preheat the oven to 350 degrees. Stir together butter, flours, and unrefined sugar until coarse, even-sized crumbs are formed. Press the mixture into a greased 9x13" pan, and bake for 20 minutes or until golden.

2. Turn off the oven. Sprinkle chocolate chips over crust, and return to still-warm oven for 5 - 10 minutes until chocolate chips are soft. Using a spatula, spread the chocolate chips into a thin even layer. Set the crust aside to cool.

3. While the crust cools completely, whip the Soyatoo according to package directions. In a separate large bowl, blend cream cheese, powdered sugar, and vanilla. Carefully fold in the Soyatoo until the entire filling is well combined.

4. Spread the filling into cooled crust. Gently top evenly with the cherry pie filling, and chill for at least 3 hours {overnight is preferable}. Cut into squares and serve.

Note: You can leave out the chocolate chips if you prefer a simpler dessert, or if you don't like chocolate. Ninjahusband preferred the torte without the layer of chocolate. I preferred it with.

Monday, February 1, 2010

General Tao's Tofu

General Tao's Tofu

Recently I've been discovering the wonder that is VegWeb.com. Previously I was wary of the site, being that all the recipes are user-submitted {and I remember a particularly horrendous mushroom pate that a friend made using a recipe from that site. It included dried stuffing mix...} However, I discovered upon further investigation that each recipe has a user rating, as well as comments and pictures that can give you a pretty accurate idea of how the recipe is going to turn out before you make it.

The most popular recipe on the site, hands down, is General Tao's Tofu. Naturally, it was the first one I tried. As I was making it, I noticed a few things that could use a few tweaking {and some serious re-writing, for clarity}. Here is the recipe, re-written and including my tweaks.

General Tao's Tofu
Serves 4

16 oz container extra firm tofu, drained, pressed, and cut into cubes
flour, in a shallow dish
2 tbsp vegetable oil, plus more for frying
4 chopped green onions
1.5 tbsp minced ginger
1.5 tbsp minced garlic
1 cup vegetable stock
3 tbsp soy sauce
6 tbsp sugar
a pinch of red pepper flakes {to taste}
1.5 tbsp white wine vinegar
1.5 tbsp cornstarch dissolved in 3 tbsp cold water
1 lb broccoli, steamed

1. Heat a thin layer of vegetable oil in a large pan until hot but not smoking. Coat the tofu in the flour. Transfer the tofu to the pan and fry until golden brown on all sides. Remove to a paper towel-lined plate and set aside.

2. Meanwhile, heat 2 tbsp additional oil in a separate pan over medium high heat. Add green onions, ginger, and garlic, and cook for 2 - 3 minutes, until tender. Be careful not to burn the garlic. Stir in the vegetable stock, soy sauce, sugar, red pepper flakes, and vinegar. Whisk in the cornstarch and water mixture, and cook the sauce for several minutes, stirring often, until bubbling and thick.

3. Add the fried tofu and steamed broccoli to the sauce, tossing lightly to coat. Serve over your choice of rice.

If you like, you can leave the broccoli separate and serve it on the side.

Sunday, January 31, 2010

Jasmine's Birthday Cake

Jasmine's Birthday Cake

This past month, my baby sister, Jasmine, turned 19! I could scarcely believe it. I remember when she was born, yadda yadda *insert nostalgic big sister rambling here*. Being that Jasmine is here going to university {and 1000 miles away from home}, I knew that I wanted to be the one to make her a birthday cake and make sure that her birthday was special.

When asked what kind of birthday cake she wanted, Jasmine's only request was "chocolate, and lots of it". I decided to go with the Rich Chocolate Cake recipe from The PPK, and this Vegan Chocolate Buttercream recipe from Epicurious. Both the cake and the frosting were delicious, however the frosting was not your typical buttercream. You know that fudgy glossy frosting grocery store bakeries slather on their brownies? It was more like that...which turned out to be amazing!

Since I fail at cake decorating, I decided to employ the help of my printer {and exploit Jasmine's love of Audrey Hepburn}. My feeble efforts had the desired effect, and Jasmine squealed when she saw her cake.

It was a big hit, and she took the leftover cake home to her roommates. Apparently her roommates want to erect a statue in my honor. All in a vegan superhero's day's work...all in a day's work.

Saturday, January 30, 2010

Kristina's Birthday Dinner

Kristina's Birthday Dinner

I am not one of those people who has a vast number of friends, but those I do have I'm very close to. I am lucky to have a small, closely knit group of amazing friends whom I love very dearly. I love to express my affection for my friends by cooking for them, and I especially like to cook big elaborate birthday dinners. In celebration of my dear friend Kristina's birthday, I made her "whatever she was craving". This is what she was craving:

1. Roasted Brussel Sprouts: Brussel sprouts lightly steamed, then tossed in olive oil, salt, and pepper. The sprouts are then roasted at 400 degrees until they are crisp on the outside, tender on the inside, and starting to caramelize.

2. Soytan Dream Cutlets from 1000 Vegan Recipes, dipped in soy milk, coated in panko, and pan fried. Topped with a quick mushroom and red wine sauce: Sautee 6 oz of chopped mushrooms w/ 2 shallots until both ingredients are tender. Add in 1/2 cup red wine, and cook until the wine reduces and mostly evaporates. Whisk in 2 cups good vegetable or vegan "beef" broth, and 1 tbsp cornstarch {dissolved in 2 tbsp cold water}. Whisk until sauce bubbles and thickens. Serve immediately.

3. "Cheeseburger" Macaroni: My favorite macaroni and "cheese" recipe {which I'm still perfecting, and will post soon}, mixed with vegan ground beef that was sauteed with a finely chopped onion. The mixture then gets poured into a 9x13" pan, covered with panko, and thrown under the broiler until the breadcrumbs are golden brown.

4. Vanilla Cheesecake w/ Cherry Topping: For dessert, she requested cheesecake with cherry topping. I used a recipe from 1000 Vegan Recipes called Not-So-Plain Vanilla Cheezcake. It was delicious.

Thursday, January 28, 2010

Pretty Much the Best Hummus of All Time

Pretty Much the Best Hummus of All Time

Come to find out, I have been making hummus incorrectly my whole life. Come to find out, I've really been making "chickpea mash".

Lately I've been craving that really creamy, tangy hummus you get at middle eastern restaurants, but could not re-create it at home to save my life. I knew I had all the ingredients, right, I knew that I was adding enough liquid to get the right consistency, so why was it pasty or "mashy", rather than creamy and delicious?

On a desperate mission to find the knowledge I sought, I pored over dozens of recipes, looking for something different, anything different, that might help me finally make the perfect hummus. I came across this recipe on VegWeb, called Creamy Hummus, Restaurant Style. It introduced the concept of creating an emulsion between your tahini and your lemon juice BEFORE adding any other ingredients. Genius! Why hadn't I thought of that sooner?

Carefully following my new-found technique, I made the batch of hummus pictured above. It was...incredible. Just like the illusive hummus from my beloved restaurants.

Pretty Much the Best Hummus of All Time

4 tbsp tahini
4 tbsp lemon juice
1+ cloves of garlic, smashed {I used just one and it was plenty garlicky enough, you may use more if you must, for warding off vampires or something}
14 oz can of chickpeas, drained and rinsed
olive oil
water
salt
garnish of choice

1. Emulsify the tahini and lemon juice in your blender or food processor until very creamy, at least a minute or two. Add the garlic and puree until smooth.

2. Slowly start adding your chickpeas, one small handful at a time. Alternate additions of chickpeas with drizzles of olive oil and water, adding salt occasionally. Taste and check the texture often, and stop adding olive oil, water, chickpeas, and salt when you have a hummus with the taste and texture of your dreams.

3. Serve drizzled with olive oil, and sprinkled with your garnish of choice {mine was influenced by my addiction to smoked paprika}.

You may not use all the chickpeas in the can {although I did}, and as much as I loathe to give you quantities {this is really best done by eye/taste}, I think I used 2 - 3 tbsp of olive oil and 4 tbsp of water, total.

Aaaaand I just remembered that I have leftover hummus in my fridge. Until next time...